Battlefield 3 multiplayer strategy: Operation Metro Part 1

Here's the basics. I'll have a more detailed design for the second post. Also, there's no tank.
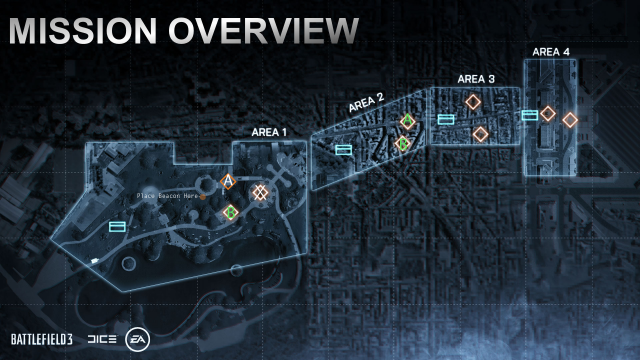
So with WiNG’s impressions on the table, I thought it prudent to return to my roots here on T3. I did a couple posts way back in the day about Bad Company 2 strategy, and now BF3’s here, I’m going to do the same thing. You’ll find no whining about glitches or prone or camping here, only effective ways to achieve victory. I don’t have access to my monster PC right now, school being more important, so you’ll have to bear with me. There’s a detailed map of Operation Metro below, and if you haven’t seen the map for yourself in game, that will have to do. Let’s get started.
Don’t stop before you’ve started
The trick to any Rush map is speed. You need to always have the defense off balance, or the attackers constantly pushed back. For the first base on attack, the focus here, I recommend one of two strategies. First, play the spawn role. Since the alpha, they’ve returned to the BC2 spawn system. If no one in your squad is running Recon, take it on yourself to play the role of forward spawn point. Second option: if you are playing recon (and not being a furless wookie), slap on the PP2000/UMP or any other SMG, put down that radio beacon and go. Make sure the defense is paranoid and just off their toes.
As for which MCOM to take first, my goal is always A. Set some kind of spawn hidden is the bushes on the B side of the large ring or behind the stone blocks to their right (see the map if you’re confused). From there, you have a short walk to A and only a few steps more to B. You’ll want to survey the defense for a few moments. Listen to where the gunfire’s coming from, and pop your head up a few times in a crouch to see if there are any actual bodies looking at the objective. You can’t predict everything, and you won’t see everything, so there’s risk involved. Someone has to jump on it, it may as well be you. Dive to prone and arm that sonuvabitch.
I do not, I repeat, do not, recommend getting up and going for B if A is armed and you’re unsure of the support the rest of your team’s providing. Sometimes, one man is all it takes to get the job done. Pick a good hiding and camp to be sure the station detonates. Listen for the disarm beeps and move in. Prioritize the disarmer first and his guards second. You may die, but that’s risk you have to take.
When you get A, take the left hand side of the playground to the MCOM. Go prone on the bottom right side of the station. This lets the crate guard you from the most prominent area of danger. Go prone behind the satellite array in the playground and wait as with A. Again this might take you a few tries and few different hiding spots, but persistence is more effective than camping ever will be. Team support is always a plus, but I’ve been in plenty of situations where I and I alone took care of business. I know if you’re reading this, you can too.
You should be able to enter the subway through there…
The second base is not as hard as the third in theory, but it can be in practice. Your objective here is flanking, and flanking hard. The path that works best for me it taking the red tunnel and crossing the train tracks into the middle. While this part is very choke-pointy, the defenders have a lot of ground to cover, and sixteen players actually doesn’t allow for the blockage of every route. In my experience, only one or two defenders set up in the green center tunnel, and if you have a close range weapon, success there is most times assured. If you can, put up a radio beacon in one of the locker rooms, then take a quick peek at the escalator section just beyond. Six times out of ten, spring across and up to the second level should net you a very good position. Place a second radio beacon up here. This location gives you direct access to B and a back-flank on A. If you get a squad or two up there and dig in, the base is yours.
A quick strategy for the MCOM areas themselves. There are two areas in both locations to set up a defense. There is a big stack of cinder blocks to go prone behind, but this is a known area. One I’ve found not so known is up against the plywood behind the pillar. You’ll need a quicker trigger finger, as defenders sometimes face that way while disarming, but surprise is best. For A, the best position is in the stalls across from the MCOM, but those behind it are good for ambush tactics. The corners work as well.
Tackling the progression through stages 3 and 4
Whew. Stay tuned for my next piece, in which I’ll detail strategies for the final two sections of the Operation Metro rush map in Battlefield 3.
Want to guarantee you get the newest updates from Top Tier Tactics, including the next iteration of this strategy guide? Get the T3 Newsletter today to get article alerts.


The reason I like BF3 is its so close to being in real combat, you’re right with being constantly on the move to keep the defense off balance, the last thing you want in modern warfare is or the enemy to dig in on a position. Last week I got some fantastic tips and tricks on multiplayer and single co-op tactics, follow the link here http://tinyurl.com/3bpmnay
[…] read Xiant’s Battlefield 3 Operation Metro guide before, but here are some live action tips for gaining massive points, exploiting map geometry, and […]
[…] of the map file, ensuring you can all collaborate sans problème. While a couple maps I downloaded (Operation Metro comes to mind) were a tad blurry, the devs (and the eventual community) will be updating their […]
[…] para o português, visto que a leitura em inglês pode se tornar meio complicada. Assim como na postagem original, este guia estará dividido em duas partes, cada uma falando sobre metade da […]